Managing Packages and Processes
A typical Linux system has thousands of files. The Filesystem Hierarchy Standard (discussed in detail in a later chapter) provides a guideline for distributions on how to organize these files. In this chapter, you will see how software package management systems can provide you with information about the location of files belonging to a package.
The Linux kernel is at the core of the GNU/Linux operating system. This chapter will discuss the role of the Linux kernel and how it provides information about the system under the/proc and /sys pseudo-filesystems.
You will see how each command that you execute causes a process to be run and how you can view running processes with the ps command. You will also see discussion of how the system records or logs messages from the background processes called daemons.
Finally, you will see how to view the kernel ring buffer to view messages it contains with the dmesg command.
Навигация по статье:
- 1.1 Package Management
- 1.1.1 Debian Package Management
- 1.1.1.1 Debian - Adding Packages
- 1.1.1.2 Debian - Updating Packages
- 1.1.1.3 Debian - Removing Packages
- 1.1.1.4 Debian - Querying Packages
- 1.1.2 RPM Package Management
- 1.1.2.1 RPM - Adding Packages
- 1.1.2.2 RPM - Updating Packages
- 1.1.2.3 RPM - Removing Packages
- 1.1.2.4 RPM - Querying Packages
- 1.2 Linux Kernel
- 1.3 Process Hierarchy
- 1.4 ps (Process) Command
- 1.5 top Command
- 1.6 free Command
- 1.7 Log Files
- 1.8 dmesg Command
1.1 Package Management
Package management is a system by which software can be installed, updated, queried or removed from a filesystem. In Linux, there are many different software package management systems, but the two most popular are those from Debian and Red Hat.
1.1.1 Debian Package Management
The Debian distribution and its derivatives such as Ubuntu and Mint, use the Debian package management system. At the heart of Debian-derived distributions package management are the software packages that are distributed as files ending in ".deb".
The lowest level tool for managing these files is the dpkg command. This command can be tricky for novice Linux users, so the Advanced Package Tool, apt-get, a front-end program to the dpkg tool, makes management of packages even easier. There are other command line tools which serve as front-ends to dpkg, such as aptitude, as well as GUI front-ends like synaptic and software-center (shown below).

1.1.1.1 Debian - Adding Packages
The Debian repositories contain more than 65,000 different packages of software. To get an updated list from these Internet repositories, you can execute the sudo apt-get update command.
To search for keywords within these packages, you can use the sudo apt-cache search keyword command.
Once you've found the package that you want to install, you can install it with the sudo apt-get install package command.
apt-cache command searches repositories on the Internet for these software programs.1.1.1.2 Debian - Updating Packages
If you want to update an individual package, you perform the command to install that package: sudo apt-get install package
If an older version of the package is already installed, then it will be upgraded. Otherwise, a new installation would take place.
If you want to update all possible packages, then you would execute the sudo apt-get upgrade command.
Users who log in with a graphical interface may have a message appear in the notification area from the update-manager indicating that updates are available, as shown below:

1.1.1.3 Debian - Removing Packages
Beware that removing one package of software may result in the removal of other packages. Due to the dependencies between packages, if you remove a package, then all packages that need, or depend on that package will be removed as well.
If you want to remove all the files of a software package, except for the configuration files, then you can execute the sudo apt-get remove package command.
If you want to remove all the files of a software package, including the configuration files, then you can execute the sudo apt-get --purge remove package command.
1.1.1.4 Debian - Querying Packages
There are several different kinds of queries that administrators need to use. To get a list of all the packages that are currently installed on the system, execute the dpkg -l command.
To list the files that comprise a particular package, you can execute the dpkg -L package command.
To query a package for information, or its state, use the dpkg -s package command.
To determine if a particular file was put on the filesystem as the result of installing a package, use the dpkg -S /path/to/file command. If the file was part of a package, then the package name could be provided. For example:
sysadmin@localhost:~$ dpkg -S /usr/bin/who
coreutils: /usr/bin/who
The previous example shows the file /usr/bin/who is part of the coreutils package.
1.1.2 RPM Package Management
The Linux Standards Base, which is a Linux Foundation project, is designed to specify (through a consensus) a set of standards that increase the compatibility between conforming Linux systems. According to the Linux Standards Base, the standard package management system is RPM.
RPM makes use of an .rpm file for each software package. This system is what Red Hat-derived distributions (like Red Hat, Centos, and Fedora) use to manage software. In addition, several other distributions that are not Red Hat-derived (such as SUSE, OpenSUSE and Mandriva) also use RPM.
Like the Debian system, RPM Package Management systems track dependencies between packages. Tracking dependencies ensures that when you install a package, the system will also install any packages needed by that package to function correctly. Dependencies also ensure that software updates and removals are performed properly.
The back-end tool most commonly used for RPM Package Management is the rpm command. While the rpm command can install, update, query and remove packages, the command line front end tools such as yum and up2date automate the process of resolving dependency issues.
In addition, there are GUI-based front end tools such as yumex and gpk-application (shown below) that also make RPM package management easier.
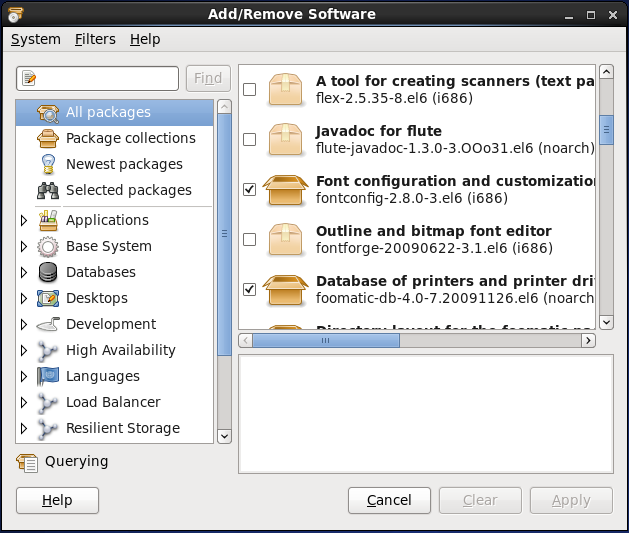
You should note that the many of following commands will require root privileges. The rule of thumb is that if a command affects the state of a package, you will need to have administrative access. In other words, a regular user can perform a query or a search, but to add, update or remove a package requires the command be executed as the root user.
1.1.2.1 RPM - Adding Packages
To search for a package from the configured repositories, execute the yum search keyword command.
To install a package, along with its dependencies, execute the yum install package command.
1.1.2.2 RPM - Updating Packages
If you want to update an individual software package, you can execute the yum update package command.
If you want to update all packages, you can execute the yum update command.
If updates are available and the user is using the GUI, then the gpk-update-viewer may show a message in the notification area of the screen indicating that updates are available.

1.1.2.3 RPM - Removing Packages
As is the case with any package management system that tracks dependencies, if you want to remove one package, then you may end up removing more than one, due to the dependencies. The easiest way to automatically resolve the dependency issues is to use a yum command:
yum remove package
While you can remove software packages with the rpm command, it won't remove dependency packages automatically.
1.1.2.4 RPM - Querying Packages
Red Hat package management is similar to Debian package management when it comes to performing queries. It is best to use the back-end tool, rpm, instead of the front-end tool, yum. While front-end tools can perform some of these queries, performance suffers because these commands typically connect to multiple repositories across the network when executing any command. The rpm command performs its queries by connecting to a database that is local to the machine and doesn't connect over the network to any repositories.
To get a list of all the packages that are currently installed on the system, execute the rpm -qa command.
To list the files that comprise a particular package, execute the rpm -ql package command.
To query a package for information, or its state, execute the rpm -qi package command.
To determine if a particular file was put on the filesystem as the result of installing a package, execute the rpm -qf /path/to/file command.
1.2 Linux Kernel
When most people refer to Linux, they are really referring to GNU/Linux, which defines the operating system. The Gnu's Not Unix (GNU) part of this combination is provided by a Free Software Foundation project. GNU is what provides the open source equivalents of many common UNIX commands, the bulk of the essential command line commands. The Linux part of this combination is the Linux kernel, which is core of the operating system. The kernel is loaded at boot time and stays loaded to manage every aspect of the running system.
The implementation of the Linux kernel includes many subsystems that are a part of the kernel itself and others that may be loaded in a modular fashion when needed. Some of the key functions of the Linux kernel include a system call interface, process management, memory management, virtual filesystem, networking, and device drivers.
In a nutshell, the kernel accepts commands from the user and manages the processes that carry out those commands by giving them access to devices like memory, disks, network interfaces, keyboards, mice, monitors and more.
The kernel provides access to information about running processes through a pseudo filesystem that is visible under the /proc directory. Hardware devices are made available through special files under the /dev directory, while information about those devices can be found in another pseudo filesystem under the /sys directory.
The/proc directory not only contains information about running processes, as its name would suggest (process), but it also contains information about the system hardware and the current kernel configuration. See an example output below:
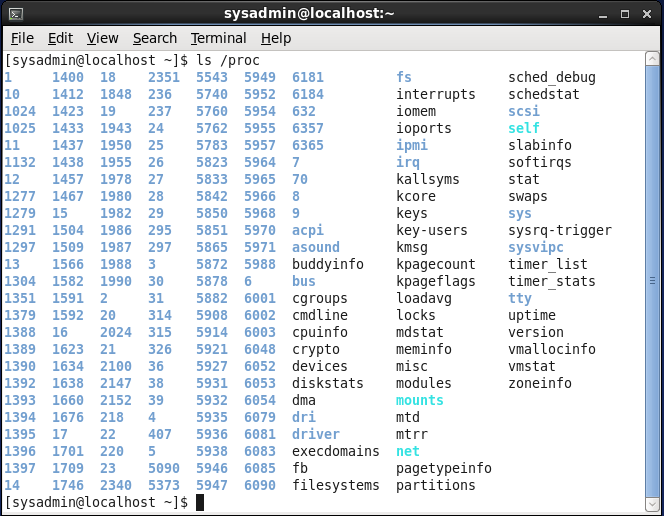
The output from executing ls /proc shows more than one hundred numbered directories. There is a numbered directory for each running process on the system, where the name of the directory matches the PID (process ID) for the running process.
Because the /sbin/init process is always the first process, it has a PID of 1 and the information about the /sbin/init process can be found in the /proc/1 directory. As you will see later in this chapter, there are several commands that allow you to view information about running processes, so it is rarely necessary for users to have to view the files for each running process directly.
You might also see that there are a number of regular files the /proc directory, such as /proc/cmdline, /proc/meminfo and /proc/modules. These files provide information about the running kernel:
- The
/proc/cmdlinefile can be important because it contains all of the information that was passed to the kernel was first started. - The
/proc/meminfofile contains information about the use of memory by the kernel. - The
/proc/modulesfile holds a list of modules currently loaded into the kernel to add extra functionality.
Again, there is rarely a need to view these files directly, as other commands offer more "user friendly" output and an alternative way to view this information.
While most of the "files" underneath the /proc directory cannot be modified, even by the root user, the "files" underneath the /proc/sys directory can be changed by the root user. Modifying these files will change the behavior of the Linux kernel.
Direct modification of these files cause only temporary changes to the kernel. To make changes permanent, entries can be added to the /etc/sysctl.conf file.
For example, the /proc/sys/net/ipv4 directory contains a file named icmp_echo_ignore_all. If that file contains a zero 0, as it normally does, then the system will respond to icmp requests. If that file contains a one 1, then the system will not respond to icmp requests:
[user@localhost ~]$ su -
Password:
[root@localhost ~]# cat /proc/sys/net/ipv4/icmp_echo_ignore_all
0
[root@localhost ~]# ping -c1 localhost
PING localhost.localdomain (127.0.0.1) 56(84) bytes of data.
64 bytes from localhost.localdomain (127.0.0.1): icmp_seq=1 ttl=64 time=0.026 ms

--- localhost.localdomain ping statistics ---
1 packets transmitted, 1 received, 0% packet loss, time 0ms
rtt min/avg/max/mdev = 0.026/0.026/0.026/0.000 ms
[root@localhost ~]# echo 1 > /proc/sys/net/ipv4/icmp_echo_ignore_all
[root@localhost ~]# ping -c1 localhost
PING localhost.localdomain (127.0.0.1) 56(84) bytes of data.

--- localhost.localdomain ping statistics ---
1 packets transmitted, 0 received, 100% packet loss, time 10000ms
1.3 Process Hierarchy
When the kernel finishes loading during the boot procedure, it starts the /sbin/init process and assigns it a Process Id (PID) of 1. This process then starts other system processes and each process is assigned a PID in sequential order.
As the /sbin/init process starts up other processes, they in turn may start up processes, which may start up other processes, on and on. When one process starts another process, the process that performs the starting is called the parent process and the process that is started is called the child process. When viewing processes, the parent PID will be labeled PPID.
When the system has been running for a long time, it will eventually reach the maximum PID value, which can be viewed and configured through the /proc/sys/kernel/pid_max file. Once the largest PID has been used, the system will "roll over" and resume by assigning PID values that are available at the bottom of the range.
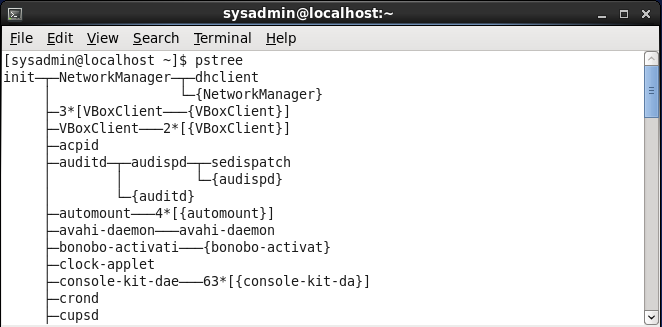
pstree command. The output will vary from the results you will see if you enter the command in the virtual machine environment of this course.You can "map" processes into a family tree of parent and child couplings. If you want to view this tree, the command pstree will display it:
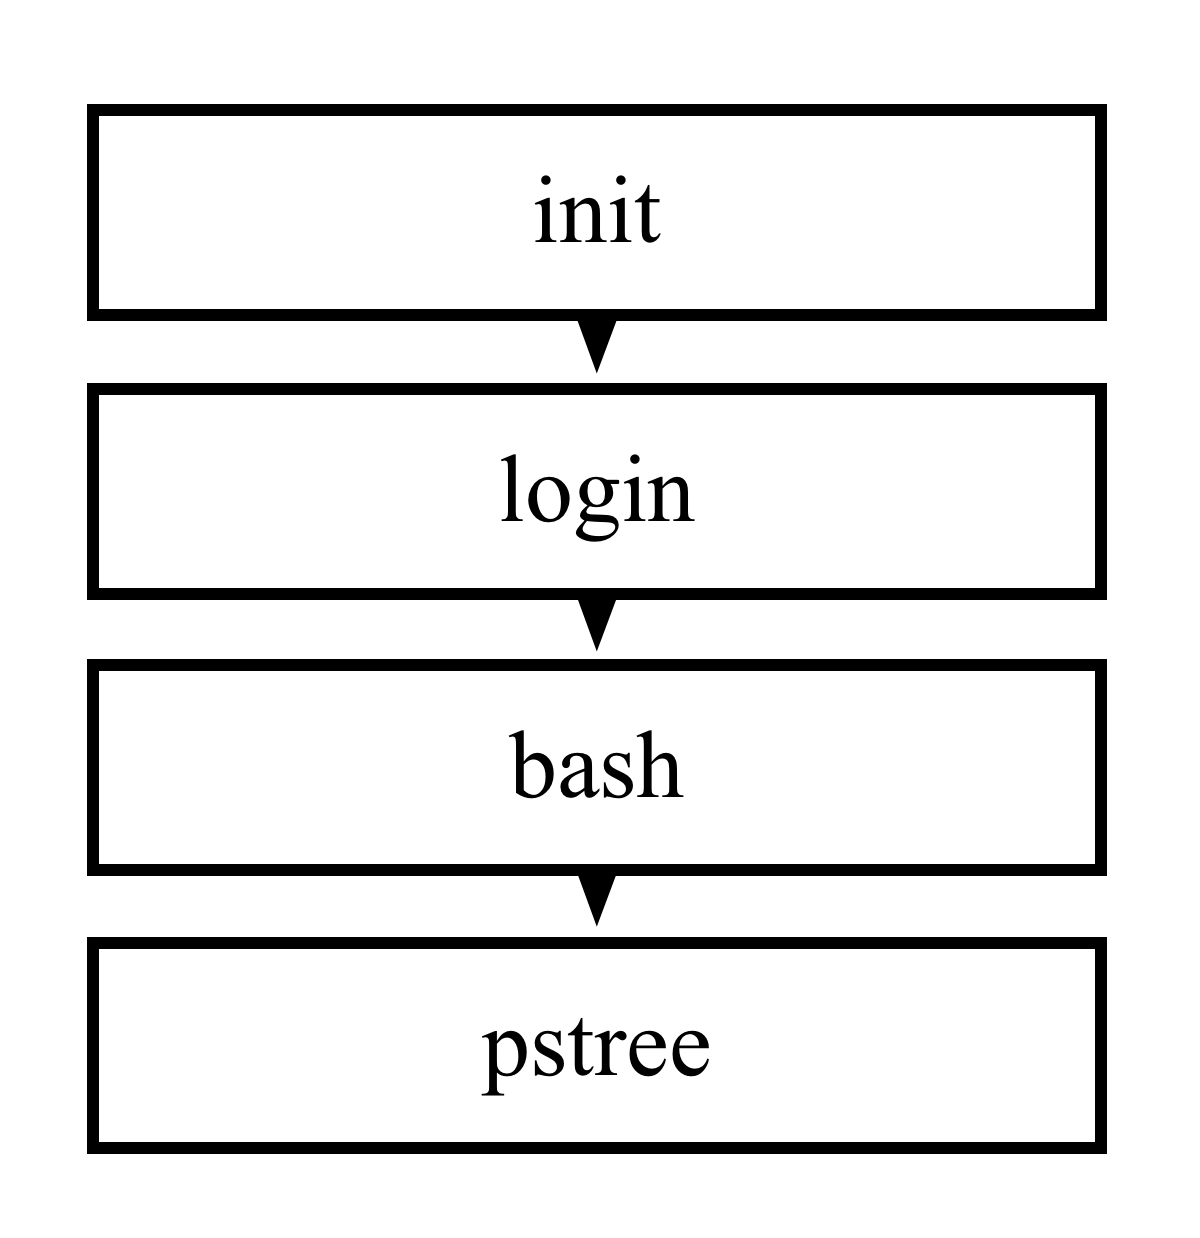
If you were to examine the parent and child processes relationship, using the output of the previous command, you could consider it to be like the following:
1.4 ps (Process) Command
Another way of viewing processes is with the ps command. By default, the ps command will only show the current processes running in the current shell. Ironically, you will see ps running when you want to see what else is running in the current shell:
sysadmin@localhost:~$ ps
  PID TTY          TIME CMD
 6054 ?        00:00:00 bash
 6070 ?        00:00:01 xeyes
 6090 ?        00:00:01 firefox
 6146 ?        00:00:00 ps
sysadmin@localhost:~$
Similar to the pstree command, if you run ps with the option --forest, then it will show lines indicating the parent and child relationship:
sysadmin@localhost:~$ ps --forest
  PID TTY          TIME CMD
 6054 ?        00:00:00 bash
 6090 ?        00:00:02   \_ firefox
 6180 ?        00:00:00   \_ dash
 6181 ?        00:00:00        \_ xeyes
 6188 ?        00:00:00        \_ ps
sysadmin@localhost:~$
To be able to view all processes on the system you can execute either the ps aux command or the ps -ef command:
sysadmin@localhost:~$ ps aux | head
USER       PID %CPU %MEM    VSZ   RSS TTY      STAT START   TIME COMMAND
root         1  0.0  0.0  17872  2892 ?        Ss   08:06   0:00 /sbin?? /ini
syslog      17  0.0  0.0 175744  2768 ?        Sl   08:06   0:00 /usr/sbin/rsyslogd -c5
root        21  0.0  0.0  19124  2092 ?        Ss   08:06   0:00 /usr/sbin/cron
root        23  0.0  0.0  50048  3460 ?        Ss   08:06   0:00 /usr/sbin/sshd
bind        39  0.0  0.0 385988 19888 ?        Ssl  08:06   0:00 /usr/sbin/named -u bind
root        48  0.0  0.0  54464  2680 ?        S    08:06   0:00 /bin/login -f
sysadmin    60  0.0  0.0  18088  3260 ?        S    08:06   0:00 -bash
sysadmin   122  0.0  0.0  15288  2164 ?        R+   16:26   0:00 ps aux
sysadmin   123  0.0  0.0  18088   496 ?        D+   16:26   0:00 -bash
sysadmin@localhost:~$ ps -ef | head
UID        PID  PPID  C STIME TTY          TIME CMD
root         1     0  0 08:06 ?        00:00:00 /sbin?? /init
syslog      17     1  0 08:06 ?        00:00:00 /usr/sbin/rsyslogd -c5
root        21     1  0 08:06 ?        00:00:00 /usr/sbin/cron
root        23     1  0 08:06 ?        00:00:00 /usr/sbin/sshd
bind        39     1  0 08:06 ?        00:00:00 /usr/sbin/named -u bind
root        48     1  0 08:06 ?        00:00:00 /bin/login -f
sysadmin    60    48  0 08:06 ?        00:00:00 -bash
sysadmin   124    60  0 16:46 ?        00:00:00 ps -ef
sysadmin   125    60  0 16:46 ?        00:00:00 head
sysadmin@localhost:~$
The output of all processes running on a system can definitely be overwhelming. In the example provided, the output of the ps command was filtered by the head command, so only the first ten processes were shown. If you don't filter the output of the ps command, then you are likely to have to scroll through hundreds of processes to find what might interest you.
A common way to run the ps command is to use the grep command to filter the output display lines that match a keyword, such as the process name. For example, if you wanted to view the information about the firefox process, you may execute a command like:
sysadmin@localhost:~$ ps -e | grep firefox
 6090 pts/0    00:00:07 firefox
As the root user, you may be more concerned about the processes of another user, than you are over your own processes. Because of the several styles of options that the ps command supports, there are different ways to view an individual user's processes. Using the traditional UNIX option, to view the processes of the sysadmin user, execute the following command:
[root@localhost ~]# ps -u username
Or use the BSD style of options and execute:
[root@localhost ~]# ps u U username
1.5 top Command
The ps command provides a "snapshot" of the processes running at the instant the command is executed, the top command that will regularly update the output of running processes. The top command is executed as follows:
sysadmin@localhost:~$ top
By default, the output of the top command is sorted by the % of CPU time that each process is currently using, with the higher values listed first. This means processes that are "CPU hogs" are listed first:
top - 16:58:13 up 26 days, 19:15,  1 user,  load average: 0.60, 0.74, 0.60
Tasks:   8 total,   1 running,   7 sleeping,   0 stopped,   0 zombie
Cpu(s):  6.0%us,  2.5%sy,  0.0%ni, 90.2%id,  0.0%wa,  1.1%hi,  0.2%si,  0.0%st
Mem:  32953528k total, 28126272k used,  4827256k free,     4136k buffers
Swap:        0k total,        0k used,        0k free, 22941192k cached

  PID USER      PR   NI VIRT RES  SHR  S %CPU %MEM     TIME+ COMMAND
    1 root      20   0 17872 2892 2640 S    0  0.0   0:00.02 init
   17 syslog    20   0  171m 2768 2392 S    0  0.0   0:00.20 rsyslogd
   21 root      20   0 19124 2092 1884 S    0  0.0   0:00.02 cron
   23 root      20   0 50048 3460 2852 S    0  0.0   0:00.00 sshd
   39 bind      20   0  376m  19m 6100 S    0  0.1   0:00.12 named
   48 root      20   0 54464 2680 2268 S    0  0.0   0:00.00 login
   60 sysadmin  20   0 18088 3260 2764 S    0  0.0   0:00.01 bash
  127 sysadmin  20   0 17216 2308 2072 R    0  0.0   0:00.01 top
There is an extensive list of commands that can be executed from within the running top program:
| Keys | Meaning |
|---|---|
| h or ? | Help |
| l | Toggle load statistics |
| t | Toggle time statistics |
| m | Toggle memory usage statistics |
| < | Move sorted column to the left |
| > | Move sorted column to the right |
| F | Choose sorted field |
| R | Toggle sort direction |
| P | Sort by % CPU |
| M | Sort by % memory used |
| k | Kill a process (or send it a signal) |
| r | Renice priority of a process |
One of the advantages of the top command is that it can be left running to stay on "top" of processes for monitoring purposes. If a process begins to dominate, or "run away" with the system, then it will by default appear at the top of the list presented by the top command. An administrator that is running the top command can then take one of two actions:
- Terminate the "run away" process: Pressing the k key while the
topcommand is running will prompt the user to provide the PID and then a signal number. Sending the default signal will request the process terminate, but sending signal number9, theKILLsignal, will force the process to terminate. - Adjust the priority of the process: Pressing the r key while the
topcommand is running will prompt the user for the process torenice, and then a niceness value. Niceness values can range from -20 to 19, and affect priority. Only the root user can use a niceness that is a lower number than the current niceness, or a negative niceness value, which causes the process to run with an increased priority. Any user can provide a niceness value that is higher than the current niceness value, which will cause the process to run with a lowered priority.
Another advantage of the top command is that it is able to give you an overall representation of how busy the system is currently and the trend over time. The load averages shown in the first line of output from the top command indicate how busy the system has been during the last one, five and fifteen minutes. This information can also be viewed by executing the uptime command or directly by displaying the contents of the /proc/loadavg file:
sysadmin@localhost:~$ cat /proc/loadavg
0.12 0.46 0.25 1/254 3052
The first three numbers in this file indicate the load average over the last one, five and fifteen minute intervals. The fourth value is a fraction which shows the number of processes currently executing code on the CPU 1 and the total number of processes 254. The fifth value is the last PID value that executed code on the CPU.
The number reported as a load average is proportional to the number of CPU cores that are able to execute processes. On a single core CPU, a value of one would mean that the system is fully loaded. On a four core CPU, a value of one would mean that the system is only 1/4 or 25% loaded.
Another reason administrators like to keep the top command running is the ability to monitor memory usage in real-time. Both the top and the free command display statistics for how overall memory is being used.
The top command also has the ability to show the percent of memory used by each process, so a process that is consuming an inordinate amount of memory can quickly be identified.
1.6 free Command
Executing the free command without any options provides a snapshot of the memory used at that moment.
If you want to monitor memory usage over time with the free command, then you can execute it with the -s option and specify that number of seconds. For example, executing free -s 10 would update the output every ten seconds.
To make it easier to interpret what the free command is outputting the -m or -g options can be useful to show the output in either megabytes or gigabytes, respectively. Without these options, the output is displayed in bytes:
sysadmin@localhost:~$ free
             total       used       free     shared    buffers     cached
Mem:      32953528   26171772    6781756          0       4136   22660364
-/+ buffers/cache:    3507272   29446256
Swap:            0          0          0
sysadmin@localhost:~$
When reading the output of the free command:
- The first line is a descriptive header.
- The second line labeled
Mem:is the statistics for the physical memory of the system. - The third line represents the amount of physical memory after adjusting those values by not taking into account any memory that is in use by the kernel for buffers and caches. Technically, this "used" memory could be "reclaimed" if needed.
- The fourth line of output refers to
Swapmemory, also known as virtual memory. This is space on the hard disk that is used like physical memory when the amount of physical memory becomes low. Effectively, this makes it seem that the system has more memory than it really does, but using swap space can also slow down the system.
If the amount of memory and swap that is available becomes very low, then the system will begin to automatically terminate processes. This is one reason why it is important to monitor the system's memory usage. An administrator that notices the system becoming low on free memory can use top or kill to terminate the processes of their own choice, rather than letting the system choose.
1.7 Log Files
As the kernel and various processes run on the system, they produce output that describes how they are running. Some of this output is displayed in the terminal window where the process was executed, but some of this data is not sent to the screen, but instead it is written to various files. This is called "log data" or "log messages".
These log files are very important for a number of reasons; they can be helpful in trouble-shooting problems and they can be used for determining whether or not unauthorized access has been attempted.
Some processes are able to "log" their own data to these files, other processes rely on another process (a daemon) to handle these log data files.
These logging daemons can vary from one distribution to another. For example, on some distributions, the daemons that run in the background to perform logging are called as syslogd and klogd. In other distributions, a single daemon such as rsyslogd in Red Hat and Centos or systemd-journald in the Fedora may serve this logging function.
Regardless of what the daemon process is named, the log files themselves are almost always placed into the /var/log directory structure. Although some of the file names may vary, here are some of the more common files to be found in this directory:
| File | Contents |
|---|---|
boot.log | Messages generated as services are started during the startup of the system. |
cron | Messages generated by the crond daemon for jobs to be executed on a recurring basis. |
dmesg | Messages generated by the kernel during system boot up. |
maillog | Messages produced by the mail daemon for e-mail messages sent or received |
messages | Messages from the kernel and other processes that don't belong elsewhere. Sometimes named syslog instead of messages after the daemon that writes this file. |
secure | Messages from processes that required authorization or authentication (such as the login process). |
Xorg.0.log | Messages from the X windows (GUI) server. |
Log files are rotated, meaning older log files are renamed and replaced with newer log files. The file names that appear in the table above may have a numeric or date suffix added to them, for example: secure.0 or secure-20131103
Rotating a log file typically occurs on a regularly scheduled basis, for example, once a week. When a log file is rotated, the system stops writing to the log file and adds a suffix to it. Then a new file with the original name is created and the logging process continues using this new file.
With the modern daemons, a date suffix is typically used. So, at the end of the week ending November 3, 2013, the logging daemon might stop writing to /var/log/messages, rename that file /var/log/messages-20131103, and then begin writing to a new /var/log/messages file.
Although most log files contain text as their contents, which can be viewed safely with many tools, other files such as the /var/log/btmp and /var/log/wtmp files contain binary. By using the file command, you can check the file content type before you view it to make sure that it is safe to view.
For the files that contain binary data, there are normally commands available that will read the files, interpret their contents and then output text. For example, the lastb and last commands can be used to view the /var/log/btmp and /var/log/wtmp files respectively.
For security reasons, most of the files found are not readable by ordinary users, so be sure to execute commands that interact with these files with root privileges.
1.8 dmesg Command
The /var/log/dmesg file contains the kernel messages that were produced during system startup. The /var/log/messages file will contain kernel messages that are produced as the system is running, but those messages will be mixed in with other messages from daemons or processes.
Although the kernel doesn't have its own log file normally, one can be configured for them typically by modifying either the /etc/syslog.conf or the /etc/rsyslog.conf file. In addition, the dmesg command can be used to view the kernel ring buffer, which will hold a large number of messages that are generated by the kernel.
On an active system, or one experiencing many kernel errors, the capacity of this buffer may be exceeded and some messages might be lost. The size of this buffer is set at the time the kernel is compiled, so it is not trivial to change.
Executing the dmesg command can produce up to 512 kilobytes of text, so filtering the command with a pipe to another command like less or grep is recommended. For example, if you were troubleshooting problems with your USB device, then searching for the text "USB" with the grep command being case insensitive may be helpful:
sysadmin@localhost:~$ dmesg | grep -i usb
usbcore: registered new interface driver usbfs
usbcore: registered new interface driver hub
usbcore: registered new device driver usb
ehci_hcd: USB 2.0 'Enhanced' Host Controller (EHCI) Driver
ohci_hcd: USB 1.1 'Open' Host Controller (OHCI) Driver
ohci_hcd 0000:00:06.0: new USB bus registered, assigned bus number 1
usb usb1: New USB device found, idVendor=1d6b, idProduct=0001
usb usb1: New USB device strings: Mfr=3, Product=2, SerialNumber=1
Все материалы взяты с официального курса NDG Linux Essential