Working with Files and Directories
When working in a Linux Operating System, you will need to know how to manipulate files and directories. Some Linux distributions have GUI-based applications that allow you to manage files, but it is important to know how to perform these operations via the command line.
The command line features a rich collection of commands that allow you to manage files. In this chapter you will learn how to list files in a directory as well as how to copy, move and delete files.
The core concepts taught in this chapter will be expanded in later chapters as more file manipulation commands are covered, such as how to view files, compress files and set file permissions.
Навигация по статье:
- 1.1 Understanding Files and Directories
- 1.1.1 Directory Path
- 1.1.2 Home Directory
- 1.1.3 Current Directory
- 1.1.4 Changing Directories
- 1.1.5 Absolute vs. Relative Pathnames
- 1.2 Listing Files in a Directory
- 1.2.1 Listing Colors
- 1.2.2 Listing Hidden Files
- 1.2.3 Long Display Listing
- 1.2.3.1 Human Readable Sizes
- 1.2.4 Listing Directories
- 1.2.5 Recursive Listing
- 1.2.6 Sort a Listing
- 1.2.7 Listing With Globs
- 1.3 Copying Files
- 1.3.1 Verbose Mode
- 1.3.2 Avoid Overwriting Data
- 1.3.3 Copying Directories
- 1.4 Moving Files
- 1.5 Moving Files While Renaming
- 1.5.1 Renaming Files
- 1.5.2 Additional mv Options
- 1.6 Creating Files
- 1.7 Removing Files
- 1.8 Removing Directories
- 1.9 Making Directories
1.1 Understanding Files and Directories
Files are used to store data such as text, graphics and programs. Directories (AKA, "folders") are used to provide a hierarchical organization structure. This structure is somewhat different than what you might be used to if you have previously worked on Microsoft Windows systems.
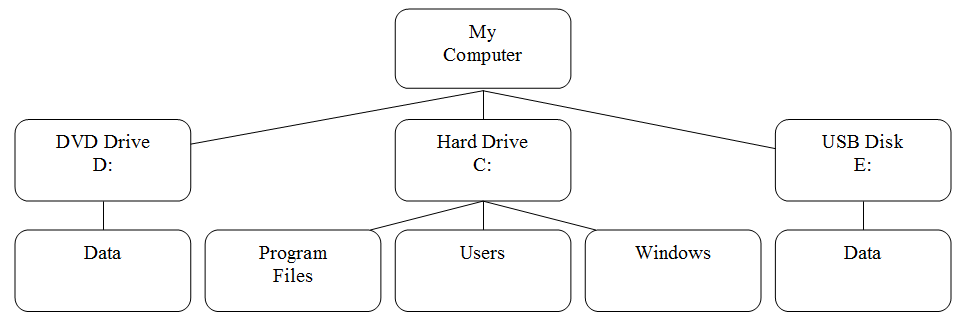
On a Windows system, the top level of the directory structure is called My Computer. Each physical device (hard drive, DVD drive, USB thumb drive, network drive, etc.) shows up under My Computer, each assigned a drive letter, such as C: or D:. A visual representation of this structure:
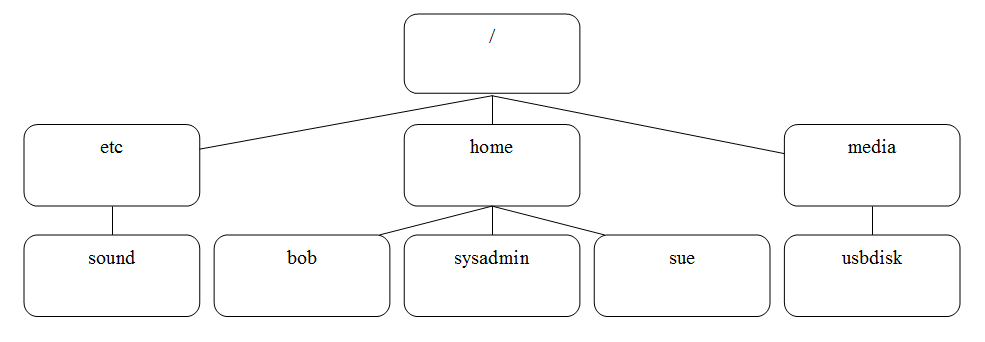
Like Windows, a Linux directory structure has a top level, however it is not called My Computer, but rather the root directory and it is symbolized by the / character. There are also no drives in Linux; each physical device is accessible under a directory, not a drive letter. A visual representation of a typical Linux directory structure:
To view the root filesystem, type ls /:
sysadmin@localhost:~$ ls /
bin   dev  home  lib    media  opt   root  sbin     selinux  sys  usr
boot  etc  init  lib64  mnt    proc  run   sbin???  srv   tmp  var
Notice that there are many descriptive directories including /boot, which contains files to boot the computer.
1.1.1 Directory Path
Using the graphic in the previous section as a point of reference, you will see that there is a directory named sound under a directory named etc, which is under the / directory. An easier way to say this, is to refer to the path.
The /etc directory originally stood for “et cetera” in early documentation from Bell Labs and used to contain files that did not belong elsewhere. In modern Linux distributions, the /etc directory typically holds static configuration files as defined by the File Hierarchy Standard (FHS).
A path allows you to specify the exact location of a directory. For the sound directory, the path would be /etc/sound. The first / character represents the root directory, while each other / character is used to separate the directory names.
This sort of path is called an absolute path. With an absolute path, you always provide directions to a directory (or a file) starting from the top of the directory structure, the root directory. Later in this chapter, we will cover a different sort of path called a relative path.
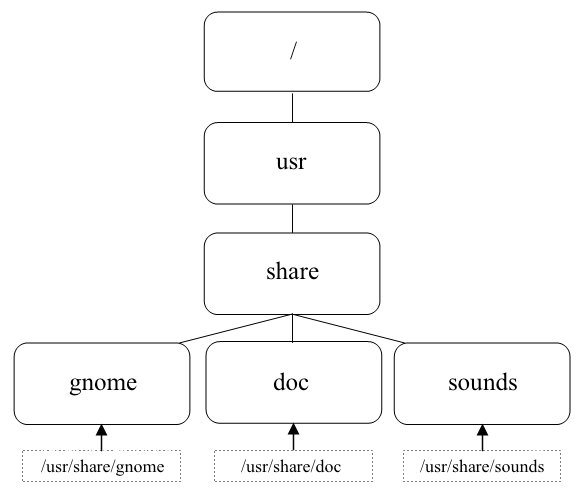
The following graphic demonstrates three additional absolute paths:
1.1.2 Home Directory
The term home directory often causes confusion to beginning Linux users. To begin with, on most Linux distributions there is a directory called home under the root directory: /home.
Under this /home directory there will be a directory for each user on the system. The directory name will be the same as the name of the user, so a user named "bob" would have a home directory called /home/bob.
Your home directory is a very important directory. To begin with, when you open a shell, you should automatically be placed in your home directory, as this is where you will do most of your work.
Additionally, your home directory is one of the few directories where you have the full control to create and delete additional files and directories. Most other directories in a Linux filesystem are protected with file permissions, a topic that will be covered in detail in a later chapter.
On most Linux distributions, the only users who can access any files in your home directory are you and the administrator on the system (the root user). This can be changed by using file permissions.
Your home directory even has a special symbol that you can use to represent it: ~. If your home directory is /home/sysadmin, you can just type ~ on the command line in place of /home/sysadmin. You can also refer to another user's home directory by using the notation ~user, where user is the name of the user account whose home directory you want to refer to. For example, ~bob would be the same as /home/bob. Here, we will change to the user's home directory:
sysadmin@localhost:~$ cd ~
sysadmin@localhost:~$ ls
Desktop  Documents  Downloads  Music  Pictures  Public  Templates
Videos
sysadmin@localhost:~$
Note that a listing reveals subdirectories contained in the home directory. Changing directories requires attention to detail:
sysadmin@localhost:~$ cd downloads
-bash: cd: downloads: No such file or directory
sysadmin@localhost:~$
Why did the command above result in an error? That is because Linux environments are case sensitive. Changing into the Downloads directory requires the correct spelling - including the capital D:
sysadmin@localhost:~$ cd Downloads
sysadmin@localhost:~/Downloads$
1.1.3 Current Directory
Your current directory is the directory where you are currently working in a terminal. When you first open a terminal, the current directory should be your home directory, but this can change as you explore the filesystem and change to other directories.
While you are in a command line environment, you can determine your current directory by using the pwd command:
sysadmin@localhost:~$ pwd
/home/sysadmin
sysadmin@localhost:~$
Additionally, most systems have the default user prompt display the current directory:
[sysadmin@localhost ~]$
In the graphic above, the ~ character indicates your current directory. As mentioned previously, the ~ character represents your home directory.
Normally the prompt only displays the name of the current directory, not the full path from the root directory down. In other words, if you were in the /usr/share/doc directory, your prompt will likely just provide you with the name doc for the current directory. If you want the full path, use the pwd command.
1.1.4 Changing Directories
If you want to change to a different directory, use the cd (change directory) command. For example, the following command will change the current directory to a directory called /etc/sound/events:
sysadmin@localhost:~$ cd /etc/sound/events
sysadmin@localhost:/etc/sound/events$
Note that there is no output if the cd command is successful. This is one of those "no news is good news" type of things. If you try to change to a directory that does not exist, you will receive an error message:
sysadmin@localhost:/etc/sound/events$ cd /etc/junk
-bash: cd: /etc/junk: No such file or directory
sysadmin@localhost:/etc/sound/events$
If you want to return to your home directory, you can either type the cd command with no arguments or use the cd command with the ~ character as an argument:
sysadmin@localhost:/etc/sound/events$ cd
sysadmin@localhost:~$ pwd
/home/sysadmin
sysadmin@localhost:~$ cd /etc
sysadmin@localhost:/etc$ cd ~
sysadmin@localhost:~$ pwd
/home/sysadmin
sysadmin@localhost:~$
1.1.5 Absolute vs. Relative Pathnames
Recall that a pathname is essentially a description of where a file or directory is located in the filesystem. You can also consider a pathname to be directions that tell the system where to find a file or directory. For example, the cd /etc/perl/Net command means "change to the Net directory, that you will find under the perl directory, that you will find under the etc directory, that you will find under the / directory".
When you give a pathname that starts from the root directory, it is called an absolute path. In many cases, providing an absolute path makes sense. For example, if you are in your home directory and you want to go to the /etc/perl/Net directory, then providing an absolute path to the cd command makes sense:
sysadmin@localhost:~$ cd /etc/perl/Net
sysadmin@localhost:/etc/perl/Net$
However, what if you were in the /etc/perl directory and you wanted to go to the /etc/perl/Net directory? It would be tedious to type the complete path to get to a directory that is only one level below your current location. In a situation like this, you want to use a relative path:
sysadmin@localhost:/etc/perl$ cd Net
sysadmin@localhost:/etc/perl/Net$
A relative path provides directions using your current location as a point of reference. Recall that this is different from absolute paths, which always require you to use the root directory as a point of reference.
There is a handy relative path technique that you can use to move up one level in the directory structure: the .. directory. Regardless of which directory you are in, .. always represents one directory higher than your current directory (with the exception of when you are in the / directory):
sysadmin@localhost:/etc/perl/Net$ pwd
/etc/perl/Net
sysadmin@localhost:/etc/perl/Net$ cd ..
sysadmin@localhost:/etc/perl$ pwd
/etc/perl
sysadmin@localhost:/etc/perl$
Sometimes using relative pathnames are a better choice than absolute pathnames, however this is not always the case. Consider if you were in the /etc/perl/Net directory and then you wanted to go to the /usr/share/doc directory. Using an absolute pathname, you would execute the cd /usr/share/doc command. Using relative pathnames, you would execute the cd ../../../usr/share/doc command:
sysadmin@localhost:/etc/perl/Net$ cd
sysadmin@localhost:~$ cd /etc/perl/Net
sysadmin@localhost:/etc/perl/Net$ cd /../../../usr/share/doc
sysadmin@localhost:/usr/share/doc$ pwd
/usr/share/doc
sysadmin@localhost:/usr/share/doc$
cd command. Any time you specify a file or a directory you can use either relative or absolute paths.While the double dot (..) is used to refer to the directory above the current directory, the single dot (.) is used to refer to the current directory. It would be pointless for an administrator to move to the current directory by typing cd . (although it actually works). It is more useful to refer to an item in the current directory by using the ./ notation. For instance:
sysadmin@localhost:~$ pwd
/home/sysadmin
sysadmin@localhost:~$ cd ./Downloads/
sysadmin@localhost:~/Downloads$ pwd
/home/sysadmin/Downloads
sysadmin@localhost:~/Downloads$ cd ..
sysadmin@localhost:~$ pwd
/home/sysadmin
sysadmin@localhost:~$
.) as a reference point is not to be confused with using it at the beginning of a filename. Read more about hidden files in Section 6.4.2.1.2 Listing Files in a Directory
Now that you are able to move from one directory to another, you will want to start displaying the contents of these directories. The ls command (ls is short for list) can be used to display the contents of a directory as well as detailed information about the files that are within a directory.
By itself, the ls command will list the files in the current directory:
sysadmin@localhost:~$ ls
Desktop  Documents  Downloads  Music  Pictures  Public  Templates
Videos
sysadmin@localhost:~$
1.2.1 Listing Colors
There are many different types of files in Linux. As you learn more about Linux, you will discover many of these types. The following is a brief summary of some of the more common file types:
| Type | Description |
|---|---|
| plain file | A file that isn't a special file type; also called a normal file |
| directory | A directory file (contains other files) |
| executable | A file that can be run like a program |
| symbolic link | A file that points to another file |
On many Linux distributions, regular user accounts are modified so that the ls command displays filenames, color-coded by file type. For example, directories may be displayed in blue, executable files may be displayed in green, and symbolic links may be displayed in cyan (light blue).
This is not a normal behavior for the ls command, but rather something that happens when you use the --color option to the ls command. The reason why ls seems to automatically perform this coloring, is that there is an alias for the ls command so it runs with the --color option:
sysadmin@localhost:~$ alias
alias egrep='egrep --color=auto'
alias fgrep='fgrep --color=auto'
alias grep='grep --color=auto'
alias l='ls -CF'
alias la='ls -A'
alias ll='ls -alF'
alias ls='ls --color=auto'
sysadmin@localhost:~$
As you can see from the output above, when the ls command is executed, it really runs the command ls --color=auto.
In some cases, you might not want to see all of the colors (they can be a bit distracting sometimes). To avoid using the alias, place a backslash character \ in front of your command:
sysadmin@localhost:~$ ls
Desktop  Documents  Downloads  Music  Pictures  Public  Templates
Videos
sysadmin@localhost:~$ \ls
Desktop  Documents  Downloads  Music  Pictures  Public  Templates
Videos
sysadmin@localhost:~$
1.2.2 Listing Hidden Files
When you use the ls command to display the contents of a directory, not all files are shown automatically. The ls command doesn't display hidden files by default. A hidden file is any file (or directory) that begins with a dot . character.
To display all files, including hidden files, use the -a option to the ls command:
sysadmin@localhost:~$ ls -a
.             .bashrc   .selected_editor  Downloads  Public
..            .cache    Desktop           Music      Templates
.bash_logout  .profile  Documents         Pictures   Videos
Why are files hidden in the first place? Most of the hidden files are customization files, designed to customize how Linux, your shell or programs work. For example, the .bashrc file in your home directory customizes features of the shell, such as creating or modifying variables and aliases.
These customization files are not ones that you work with on a regular basis. There are also many of them, as you can see, and having them displayed will make it more difficult to find the files that you do regularly work with. So, the fact that they are hidden is to your benefit.
1.2.3 Long Display Listing
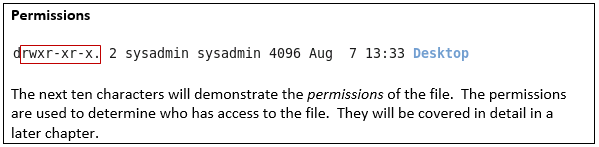
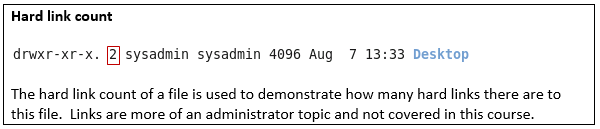
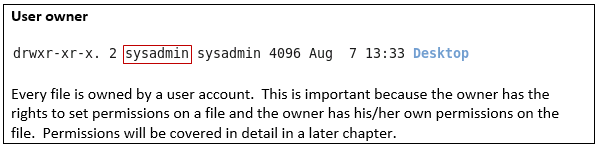
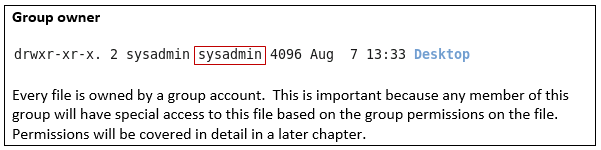
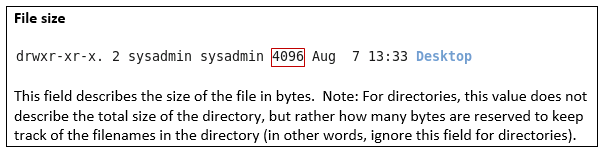
There is information about each file, called metadata that is sometimes helpful to display. This may include who owns a file, the size of a file and the last time the contents of a file were modified. You can display this information by using the -l option to the ls command:
sysadmin@localhost:~$ ls -l
total 0
drwxr-xr-x 1 sysadmin sysadmin 0 Jan 29  2015 Desktop
drwxr-xr-x 1 sysadmin sysadmin 0 Jan 29  2015 Documents
drwxr-xr-x 1 sysadmin sysadmin 0 Jan 29  2015 Downloads
drwxr-xr-x 1 sysadmin sysadmin 0 Jan 29  2015 Music
drwxr-xr-x 1 sysadmin sysadmin 0 Jan 29  2015 Pictures
drwxr-xr-x 1 sysadmin sysadmin 0 Jan 29  2015 Public
drwxr-xr-x 1 sysadmin sysadmin 0 Jan 29  2015 Templates
drwxr-xr-x 1 sysadmin sysadmin 0 Jan 29  2015 Videos
sysadmin@localhost:~$
In the output above, each line describes metadata about a single file. The following describes each of the fields of data that you will see in the output of the ls -l command:


1.2.3.1 Human Readable Sizes
When you display file sizes with the -l option to the ls command, you end up with file sizes in bytes. For text files, a byte is 1 character.
For smaller files, byte sizes are fine. However, for larger files it is hard to comprehend how large the file is. For example, consider the output of the following command:
sysadmin@localhost:~$ ls -l /usr/bin/omshell
-rwxr-xr-c 1 root root 1561400 Oct 9 2012 /usr/bin/omshell
sysadmin@localhost:~$
As you can see, the file size is hard to determine in bytes. Is 1561400 a large file or small? It seems fairly large, but it is hard to determine using bytes.
Think of it this way: if someone were to give you the distance between Boston and New York using inches, that value would essentially be meaningless because for a distance like that, you think in terms of miles.
It would be better if the file size was presented in a more human readable size, like megabytes or gigabytes. To accomplish this, add the -h option to the ls command:
sysadmin@localhost:~$ ls -lh /usr/bin/omshell
-rwxr-xr-c 1 root root 1.5M Oct 9 2012 /usr/bin/omshell
sysadmin@localhost:~$
-h option must be used with the -l option.1.2.4 Listing Directories
When the command ls -d is used, it refers to the current directory, and not the contents within it. Without any other options, it is rather meaningless, although it is important to note that the current directory is always referred to with a single period (.):
sysadmin@localhost:~$ ls -d
.
To use the ls -d command in a meaningful way requires the addition of the -l option. In this case, note that the first command lists the details of the contents in the /home/sysadmin directory, while the second command lists the /home/sysadmin directory itself.
sysadmin@localhost:~$ ls -l
total 0
drwxr-xr-x 1 sysadmin sysadmin   0 Apr 15  2015 Desktop
drwxr-xr-x 1 sysadmin sysadmin   0 Apr 15  2015 Documents
drwxr-xr-x 1 sysadmin sysadmin   0 Apr 15  2015 Downloads
drwxr-xr-x 1 sysadmin sysadmin   0 Apr 15  2015 Music
drwxr-xr-x 1 sysadmin sysadmin   0 Apr 15  2015 Pictures
drwxr-xr-x 1 sysadmin sysadmin   0 Apr 15  2015 Public
drwxr-xr-x 1 sysadmin sysadmin   0 Apr 15  2015 Templates
drwxr-xr-x 1 sysadmin sysadmin   0 Apr 15  2015 Videos
drwxr-xr-x 1 sysadmin sysadmin 420 Apr 15  2015 test
sysadmin@localhost:~$ ls -ld
drwxr-xr-x 1 sysadmin sysadmin 224 Nov  7 17:07 .
sysadmin@localhost:~$
Note the single period at the end of the second long listing. This indicates that the current directory is being listed, and not the contents.
1.2.5 Recursive Listing
There will be times when you want to display all of the files in a directory as well as all of the files in all subdirectories under a directory. This is called a recursive listing.
To perform a recursive listing, use the -R option to the ls command:
sysadmin@localhost:~$ ls -R /etc/ppp
/etc/ppp:
chap-secrets   ip-down.ipv6to4    ip-up.ipv6to4    ipv6-up    pap-secrets
ip-down        ip-up              ipv6-down        options    peers

/etc/ppp/peers:
sysadmin@localhost:~$
Note that in the previous example, the files in the /etc/ppp directory were listed first. After that, the files in the /etc/ppp/peers directory were listed (there were no files in this case, but if any file had been in this directory, they would have been displayed).
Be careful with this option; for example, running the command ls -R / would list every file on the file system, including all files on any attached USB device and DVD in the system. Limit the use of the -R option to smaller directory structures.
1.2.6 Sort a Listing
By default, the ls command sorts files alphabetically by file name. Sometimes, It may be useful to sort files using different criteria.
To sort files by size, we can use the -S option. Note the difference in the output of the following two commands:
sysadmin@localhost:~$ ls /etc/ssh moduli
ssh_host_dsa_key.pub    ssh_host_rsa_key     sshd_confi
ssh_config        ssh_host_ecdsa_key      ssh_host_rsa_key.pub
ssh_host_dsa_key  ssh_host_ecdsa_key.pub  ssh_import_id
sysadmin@localhost:~$ ls -S /etc/ssh moduli
ssh_host_dsa_key      ssh_host_ecdsa_key
sshd_config       ssh_host_dsa_key.pub  ssh_host_ecdsa_key.pub
ssh_host_rsa_key  ssh_host_rsa_key.pub
ssh_config        ssh_import_id
sysadmin@localhost:~$
The same files and directories are listed, but in a different order. While the -S option works by itself, you can't really tell that the output is sorted by size, so it is most useful when used with the -l option. The following command will list files from largest to smallest and display the actual size of the file.
sysadmin@localhost:~$ ls -lS /etc/ssh
total 160
-rw-r--r-- 1 root root 125749 Apr 29  2014 moduli
-rw-r--r-- 1 root root   2489 Jan 29  2015 sshd_config
-rw------- 1 root root   1675 Jan 29  2015 ssh_host_rsa_key
-rw-r--r-- 1 root root   1669 Apr 29  2014 ssh_config
-rw------- 1 root root    668 Jan 29  2015 ssh_host_dsa_key
-rw-r--r-- 1 root root    607 Jan 29  2015 ssh_host_dsa_key.pub
-rw-r--r-- 1 root root    399 Jan 29  2015 ssh_host_rsa_key.pub
-rw-r--r-- 1 root root    302 Jan 10  2011 ssh_import_id
-rw------- 1 root root    227 Jan 29  2015 ssh_host_ecdsa_key
-rw-r--r-- 1 root root    179 Jan 29  2015 ssh_host_ecdsa_key.pub
sysadmin@localhost:~$
It may also be useful to use the -h option to display human-readable file sizes:
sysadmin@localhost:~$ ls -lSh /etc/ssh
total 160K
-rw-r--r-- 1 root root 123K Apr 29  2014 moduli
-rw-r--r-- 1 root root 2.5K Jan 29  2015 sshd_config
-rw------- 1 root root 1.7K Jan 29  2015 ssh_host_rsa_key
-rw-r--r-- 1 root root 1.7K Apr 29  2014 ssh_config
-rw------- 1 root root  668 Jan 29  2015 ssh_host_dsa_key
-rw-r--r-- 1 root root  607 Jan 29  2015 ssh_host_dsa_key.pub
-rw-r--r-- 1 root root  399 Jan 29  2015 ssh_host_rsa_key.pub
-rw-r--r-- 1 root root  302 Jan 10  2011 ssh_import_id
-rw------- 1 root root  227 Jan 29  2015 ssh_host_ecdsa_key
-rw-r--r-- 1 root root  179 Jan 29  2015 ssh_host_ecdsa_key.pub
sysadmin@localhost:~$
It is also possible to sort files based on the time they were modified. You can do this by using the -t option.
The -t option will list the most recently modified files first. This option can be used alone, but again, is usually more helpful when paired with the -l option:
sysadmin@localhost:~$ ls -tl /etc/ssh
total 160
-rw------- 1 root root    668 Jan 29  2015 ssh_host_dsa_key
-rw-r--r-- 1 root root    607 Jan 29  2015 ssh_host_dsa_key.pub
-rw------- 1 root root    227 Jan 29  2015 ssh_host_ecdsa_key
-rw-r--r-- 1 root root    179 Jan 29  2015 ssh_host_ecdsa_key.pub
-rw------- 1 root root   1675 Jan 29  2015 ssh_host_rsa_key
-rw-r--r-- 1 root root    399 Jan 29  2015 ssh_host_rsa_key.pub
-rw-r--r-- 1 root root   2489 Jan 29  2015 sshd_config
-rw-r--r-- 1 root root 125749 Apr 29  2014 moduli
-rw-r--r-- 1 root root   1669 Apr 29  2014 ssh_config
-rw-r--r-- 1 root root    302 Jan 10  2011 ssh_import_id
sysadmin@localhost:~$
If the files in a directory were modified many days or months ago, it may be harder to tell exactly when they were modified, as only the date is provided for older files. For more detailed modification time information you can use the --full-time option to display the complete timestamp (including hours, seconds, minutes...):
sysadmin@localhost:~$ ls -t --full-time /etc/ssh
total 160
-rw------- 1 root root    668 2015-01-29 03:17:33.000000000 +0000 ssh_host_dsa_key
-rw-r--r-- 1 root root    607 2015-01-29 03:17:33.000000000 +0000 ssh_host_dsa_key.pub
-rw------- 1 root root    227 2015-01-29 03:17:33.000000000 +0000 ssh_host_ecdsa_key
-rw-r--r-- 1 root root    179 2015-01-29 03:17:33.000000000 +0000 ssh_host_ecdsa_key.pub
-rw------- 1 root root   1675 2015-01-29 03:17:33.000000000 +0000 ssh_host_rsa_key
-rw-r--r-- 1 root root    399 2015-01-29 03:17:33.000000000 +0000 ssh_host_rsa_key.pub
-rw-r--r-- 1 root root   2489 2015-01-29 03:17:33.000000000 +0000 sshd_config
-rw-r--r-- 1 root root 125749 2014-04-29 23:58:51.000000000 +0000 moduli
-rw-r--r-- 1 root root   1669 2014-04-29 23:58:51.000000000 +0000 ssh_config
-rw-r--r-- 1 root root    302 2011-01-10 18:48:29.000000000 +0000 ssh_import_id
sysadmin@localhost:~$
The --full-time option will assume the -l option automatically.
It is possible to perform a reverse sort with either the -S or -t options by using the -r option. The following command will sort files by size, smallest to largest:
sysadmin@localhost:~$ ls -lrS /etc/ssh
total 160
-rw-r--r-- 1 root root    179 Jan 29  2015 ssh_host_ecdsa_key.pub
-rw------- 1 root root    227 Jan 29  2015 ssh_host_ecdsa_key
-rw-r--r-- 1 root root    302 Jan 10  2011 ssh_import_id
-rw-r--r-- 1 root root    399 Jan 29  2015 ssh_host_rsa_key.pub
-rw-r--r-- 1 root root    607 Jan 29  2015 ssh_host_dsa_key.pub
-rw------- 1 root root    668 Jan 29  2015 ssh_host_dsa_key
-rw-r--r-- 1 root root   1669 Apr 29  2014 ssh_config
-rw------- 1 root root   1675 Jan 29  2015 ssh_host_rsa_key
-rw-r--r-- 1 root root   2489 Jan 29  2015 sshd_config
-rw-r--r-- 1 root root 125749 Apr 29  2014 moduli
sysadmin@localhost:~$
The following command will list files by modification date, oldest to newest:
sysadmin@localhost:~$ ls -lrt /etc/ssh
total 160
-rw-r--r-- 1 root root    302 Jan 10  2011 ssh_import_id
-rw-r--r-- 1 root root   1669 Apr 29  2014 ssh_config
-rw-r--r-- 1 root root 125749 Apr 29  2014 moduli
-rw-r--r-- 1 root root   2489 Jan 29  2015 sshd_config
-rw-r--r-- 1 root root    399 Jan 29  2015 ssh_host_rsa_key.pub
-rw------- 1 root root   1675 Jan 29  2015 ssh_host_rsa_key
-rw-r--r-- 1 root root    179 Jan 29  2015 ssh_host_ecdsa_key.pub
-rw------- 1 root root    227 Jan 29  2015 ssh_host_ecdsa_key
-rw-r--r-- 1 root root    607 Jan 29  2015 ssh_host_dsa_key.pub
-rw------- 1 root root    668 Jan 29  2015 ssh_host_dsa_key
sysadmin@localhost:~$
1.2.7 Listing With Globs
In a previous chapter, we discussed the use of file globs to match filenames using wildcard characters. For example, we demonstrated that you can list all of the files in the /etc directory that begin with the letter e with the following command:
sysadmin@localhost:~$ echo /etc/e*
/etc/encript.cfg /etc/environment /etc/ethers /etc/event.d /etc/exports
sysadmin@localhost:~$
Now that you know that the ls command is normally used to list files in a directory, using the echo command may seem to have been a strange choice. However, there is something about the ls command that might have caused confusion while we were discussing globs. This "feature" might also cause problems when you try to list files using glob patterns.
Keep in mind that it is the shell, not the echo or ls command, that expands the glob pattern into corresponding file names. In other words, when you typed the echo /etc/e* command, what the shell did before executing the echo command was replace e* with all of the files and directories within the /etc directory that match the pattern.
So, if you were to run the ls /etc/e* command, what the shell would really run would be this:
ls /etc/encript.cfg /etc/environment /etc/ethers /etc/event.d /etc/exports
When the ls command sees multiple arguments, it performs a list operation on each item separately. In other words, the command ls /etc/encript.cfg /etc/environment is essentially the same as ls /etc/encript.cfg; ls /etc/environment.
Now consider what happens when you run the ls command on a file, such as encript.cfg:
sysadmin@localhost:~$ ls /etc/enscript.cfg
/etc/enscript.cfg
sysadmin@localhost:~$
As you can see, running the ls command on a single file results in the name of the file being printed. Typically this is useful if you want to see details about a specific file by using the -l option to the ls command:
sysadmin@localhost:~$ ls -l /etc/enscript.cfg
-r--r--r--. 1 root root 4843 Nov 11 2010 /etc/enscript.cfg
sysadmin@localhost:~$
However, what if the ls command is given a directory name as an argument? In this case, the output of the command is different than if the argument was a file name:
sysadmin@localhost:~$ ls /etc/event.d
ck-log-system-restart  ck-log-system-start  ck-log-system-stop
sysadmin@localhost:~$
If you give a directory name as an argument to the ls command, the command will display the contents of the directory (the names of the files in the directory), not just provide the directory name. The filenames you see in the example above are the names of the files in the /etc/event.d directory.
Why is this a problem when using globs? Consider the following output:
sysadmin@localhost:~$ ls /etc/e*
/etc/encript.cfg /etc/environment /etc/ethers /etc/event.d /etc/exports
/etc/event.d:
ck-log-system-restart  ck-log-system-start  ck-log-system-stop
sysadmin@localhost:~$
As you can see, when the ls command sees a filename as an argument, it just displays the filename. However, for any directory, it will display the contents of the directory, not just the directory name.
This becomes even more confusing in a situation like the following:
sysadmin@localhost:~$ ls /etc/ev*
ck-log-system-restart  ck-log-system-start  ck-log-system-stop
sysadmin@localhost:~$
In the previous example, it seems like the ls command is just plain wrong. But what really happened is that the only thing that matches the glob /etc/ev* is the /etc/event.d directory. So, the ls command only displayed the files in that directory!
There is a simple solution to this problem: when you use glob arguments with the ls command, always use the -d option. When you use the -d option, then the ls command won't display the contents of a directory, but rather the name of the directory:
sysadmin@localhost:~$ ls -d /etc/e*
/etc/encript.cfg /etc/environment /etc/ethers /etc/event.d /etc/exports
sysadmin@localhost:~$
1.3 Copying Files
The cp command is used to copy files. It requires that you specify a source and a destination. The structure of the command is as follows:
cp [source] [destination]
The source is the file you wish to copy. The destination is where you want the copy to be located. When successful, the cp command will not have any output (no news is good news). The following command will copy the /etc/hosts file to your home directory:
sysadmin@localhost:~$ cp /etc/hosts ~
sysadmin@localhost:~$ ls
Desktop    Downloads  Pictures  Templates  hosts
Documents  Music      Public    Videos
sysadmin@localhost:~$
~ character represents your home directory.1.3.1 Verbose Mode
The -v option will cause the cp command to produce output if successful. The -v option stands for verbose:
sysadmin@localhost:~$ cp -v /etc/hosts ~
`/etc/hosts' -> `/home/sysadmin/hosts'
sysadmin@localhost:~$
When the destination is a directory, the resulting new file will have the same name as the original file. If you want the new file to have a different name, you must provide the new name as part of the destination:
sysadmin@localhost:~$ cp /etc/hosts ~/hosts.copy
sysadmin@localhost:~$ ls
Desktop    Downloads  Pictures  Templates  hosts
Documents  Music      Public    Videos     hosts.copy
sysadmin@localhost:~$
1.3.2 Avoid Overwriting Data
The cp command can be destructive to existing data if the destination file already exists. In the case where the destination file exists , the cp command will overwrite the existing file's contents with the contents of the source file. To illustrate this potential problem, first a new file is created in the sysadmin home directory by copying an existing file:
sysadmin@localhost:~$ cp /etc/skel/.bash_logout ~/example.txt
sysadmin@localhost:~$
View the output of the ls command to see the file and view the contents of the file using the more command:
sysadmin@localhost:~$ cp /etc/skel/.bash_logout ~/example.txt
sysadmin@localhost:~$ ls -l example.txt
-rw-rw-r--. 1 sysadmin sysadmin 18 Sep 21 15:56 example.txt
sysadmin@localhost:~$ more example.txt
# ~/.bash_logout: executed by bash(1) when login shell exits.

sysadmin@localhost:~$ cp -i /etc/hosts ~/example.txt
cp: overwrite `/home/sysadmin/example.txt'? n
sysadmin@localhost:~$ ls -l example.txt
-rw-rw-r--. 1 sysadmin sysadmin 18 Sep 21 15:56 example.txt
sysadmin@localhost:~$ more example.txt
# ~/.bash_logout: executed by bash(1) when login shell exits.

sysadmin@localhost:~$
In the next example, you will see that the cp command destroys the original contents of the example.txt file. Notice that after the cp command is complete, the size of the file is different (158 bytes rather than 18) from the original and the contents are different as well:
sysadmin@localhost:~$ cp /etc/hosts ~/example.txt
sysadmin@localhost:~$ ls -l example.txt
-rw-rw-r--. 1 sysadmin sysadmin 158 Sep 21 14:11 example.txt
sysadmin@localhost:~$ cat example.txt
127.0.0.1  localhost localhost.localdomain localhost4 localhost4.localdomain4
::1        localhost localhost.localdomain localhost6 localhost6.localdomain6
sysadmin@localhost:~$
There are two options that can be used to safeguard against accidental overwrites. With the -i (interactive) option, the cp will prompt before overwriting a file. The following example will demonstrate this option, first restoring the content of the original file:
sysadmin@localhost:~$ cp /etc/skel/.bash_logout ~/example.txt
sysadmin@localhost:~$ ls -l example.txt
-rw-r--r-- 1 sysadmin sysadmin 18 Sep 21 15:56 example.txt
sysadmin@localhost:~$ more example.txt
# ~/.bash_logout: executed by bash(1) when login shell exits.

sysadmin@localhost:~$ cp -i /etc/hosts ~/example.txt
cp: overwrite `/home/sysadmin/example.txt'? n
sysadmin@localhost:~$ ls -l example.txt
-rw-r--r-- 1 sysadmin sysadmin 18 Sep  21 15:56 example.txt
sysadmin@localhost:~$ more example.txt
# ~/.bash_logout: executed by bash(1) when login shell exits.

sysadmin@localhost:~$
Notice that since the value of n (no) was given when prompted to overwrite the file, no changes were made to the file. If a value of y (yes) was given, then the copy process would have taken place.
The -i option requires you to answer y or n for every copy that could end up overwriting an existing file's contents. This can be tedious when a bunch of overwrites could occur, such as the example demonstrated below:
sysadmin@localhost:~$ cp -i /etc/skel/.* ~
cp: omitting directory `/etc/skel/.'
cp: omitting directory `/etc/skel/..'
cp: overwrite `/home/sysadmin/.bash_logout'? n
cp: overwrite `/home/sysadmin/.bashrc'? n
cp: overwrite `/home/sysadmin/.profile'? n
cp: overwrite `/home/sysadmin/.selected_editor'? n
sysadmin@localhost:~$
As you can see from the example above, the cp command tried to overwrite four existing files, forcing the user to answer three prompts. If this situation happened for 100 files, it could become very annoying, very quickly.
If you want to automatically answer n to each prompt, use the -n option. It essentially stands for "no rewrite”.
1.3.3 Copying Directories
In a previous example, error messages were given when the cp command attempted to copy directories:
sysadmin@localhost:~$ cp -i /etc/skel/.* ~
cp: omitting directory `/etc/skel/.'
cp: omitting directory `/etc/skel/..'
cp: overwrite `/home/sysadmin/.bash_logout'? n
cp: overwrite `/home/sysadmin/.bashrc'? n
cp: overwrite `/home/sysadmin/.profile'? n
cp: overwrite `/home/sysadmin/.selected_editor'? n
sysadmin@localhost:~$
Where the output says ...omitting directory..., the cp command is saying that it cannot copy this item because the command does not copy directories by default. However, the -r option to the cp command will have it copy both files and directories.
Be careful with this option: the entire directory structure will be copied. This could result in copying a lot of files and directories!
1.4 Moving Files
To move a file, use the mv command. The syntax for the mv command is much like the cp command:
mv [source] [destination]
In the following example, the hosts file that was generated earlier is moved from the current directory to the Videos directory:
sysadmin@localhost:~$ ls
Desktop    Downloads  Pictures  Templates  example.txt  hosts.copy
Documents  Music      Public    Videos     hosts
sysadmin@localhost:~$ mv hosts Videos
sysadmin@localhost:~$ ls
Desktop    Downloads  Pictures  Templates  example.txt
Documents  Music      Public    Videos     hosts.copy
sysadmin@localhost:~$ ls Videos
hosts
sysadmin@localhost:~$
When a file is moved, the file is removed from the original location and placed in a new location. This can be somewhat tricky in Linux because users need specific permissions to remove files from a directory. If you don't have the right permissions, you will receive a "Permission denied" error message:
sysadmin@localhost:~$ mv /etc/hosts .
mv: cannot move `/etc/hosts' to `./hosts': Permission denied
sysadmin@localhost:~$
1.5 Moving Files While Renaming
If the destination for the mv command is a directory, the file will be moved to the directory specified. The file name will change only if a destination file name is also specified.
If a destination directory is not specified, the file will be renamed using the destination file name and remain in the source directory.
sysadmin@localhost:~$ ls
Desktop    Downloads  Pictures  Templates  example.txt
Documents  Music      Public    Videos
sysadmin@localhost:~$ mv example.txt Videos/newexample.txt
sysadmin@localhost:~$ ls
Desktop    Downloads  Pictures  Templates
Documents  Music      Public    Videos
sysadmin@localhost:~$ ls Videos
hosts  newexample.txt
sysadmin@localhost:~$
1.5.1 Renaming Files
The mv command is not just used to move a file, but also to rename a file. For example, the following commands will rename the newexample.txt file to myexample.txt:
sysadmin@localhost:~$ cd Videos
sysadmin@localhost:~/Videos$ ls
hosts  newexample.txt
sysadmin@localhost:~/Videos$ mv newexample.txt myexample.txt
sysadmin@localhost:~/Videos$ ls
hosts  myexample.txt
sysadmin@localhost:~/Videos$
Think of the previous mv example to mean "move the newexample.txt file from the current directory back into the current directory and give the new file the name myexample.txt”.
1.5.2 Additional mv Options
Like the cp command, the mv command provides the following options:
| Option | Meaning |
|---|---|
-i | Interactive move: ask if a file is to be overwritten. |
-n | Do not overwrite a destination files' contents |
-v | Verbose: show the resulting move |
-r option as the mv command will by default move directories.1.6 Creating Files
There are several ways of creating a new file, including using a program designed to edit a file (a text editor). In a later chapter, text editors will be covered.
There is also a way to simply create a file that can be populated with data at a later time. This is a useful feature since for some operating system features, the very existence of a file could alter how a command or service works. It is also useful to create a file as a "placeholder" to remind you to create the file contents at a later time.
To create an empty file, use the touch command as demonstrated below:
sysadmin@localhost:~$ ls
Desktop  Documents  Downloads  Music  Pictures  Public  Templates
Videos
sysadmin@localhost:~$ touch sample
sysadmin@localhost:~$ ls -l sample
-rw-rw-r-- 1 sysadmin sysadmin 0 Nov  9 16:48 sample
sysadmin@localhost:~$
Notice the size of the new file is 0 bytes. As previously mentioned, the touch command doesn't place any data within the new file.
1.7 Removing Files
To delete a file, use the rm command:
sysadmin@localhost:~$ ls
Desktop    Downloads  Pictures  Templates  sample
Documents  Music      Public    Videos
sysadmin@localhost:~$ rm sample
sysadmin@localhost:~$ ls
Desktop  Documents  Downloads  Music  Pictures  Public  Templates
Videos
sysadmin@localhost:~$
Note that the file was deleted with no questions asked. This could cause problems when deleting multiple files by using glob characters, for example: rm *.txt. Because these files are deleted without question, a user could end up deleting files that were not intended to be deleted.
Additionally, the files are permanently deleted. There is no command to undelete a file and no "trash can" from which to recover deleted files. As a precaution, users should use the -i option when deleting multiple files:
sysadmin@localhost:~$ touch sample.txt example.txt test.txt
sysadmin@localhost:~$ ls
Desktop    Downloads  Pictures  Templates  example.txt  test.txt
Documents  Music      Public    Videos     sample.txt
sysadmin@localhost:~$ rm -i *.txt
rm: remove regular empty file `example.txt'? y
rm: remove regular empty file `sample.txt'? n
rm: remove regular empty file `test.txt'? y
sysadmin@localhost:~$ ls
Desktop    Downloads  Pictures  Templates  sample.txt
Documents  Music      Public    Videos
sysadmin@localhost:~$
1.8 Removing Directories
You can delete directories using the rm command. However, the default usage (no options) of the rm command will fail to delete a directory:
sysadmin@localhost:~$ rm Videos
rm: cannot remove `Videos': Is a directory
sysadmin@localhost:~$
If you want to delete a directory, use the -r option to the rm command:
sysadmin@localhost:~$ ls
Desktop    Downloads  Pictures  Templates  sample.txt
Documents  Music      Public    Videos
sysadmin@localhost:~$ rm -r Videos
sysadmin@localhost:~$ ls
Desktop  Documents  Downloads  Music  Pictures  Public  Templates
sample.txt
sysadmin@localhost:~$
-i option with the rm command.You can also delete a directory with the rmdir command, but only if the directory is empty.
1.9 Making Directories
To create a directory, use the mkdir command:
sysadmin@localhost:~$ ls
Desktop  Documents  Downloads  Music  Pictures  Public  Templates
sample.txt
sysadmin@localhost:~$ mkdir test
sysadmin@localhost:~$ ls
Desktop    Downloads  Pictures  Templates   test
Documents  Music      Public    sample.txt
sysadmin@localhost:~$
Все материалы взяты с официального курса NDG Linux Essential